A garage pergola does more than fill empty space, it creates a functional transition zone between the driveway and your home’s outdoor living areas. Whether it’s extending shade over a side entrance, defining a walkway, or creating a semi-covered workspace near the garage door, a well-designed pergola adds architectural interest and usable square footage without the cost and permitting headaches of a full roof addition. In 2026, homeowners are blending traditional pergola designs with modern materials and smart features to match both their garage architecture and how they actually use the space. Here’s how to plan a garage pergola that works.
Table of Contents
ToggleKey Takeaways
- A garage pergola creates functional outdoor living space and improves curb appeal without the cost and permitting requirements of a full roof addition.
- Attached pergolas using ledger boards work best for extending shade over side doors, while freestanding options offer flexibility and easier future modifications.
- Material selection—from budget-friendly pressure-treated wood to low-maintenance composite and modern metal—determines long-term maintenance needs and aesthetic fit with your home.
- Garage pergola ideas can be enhanced with shade solutions, outdoor lighting, climbing plants, and side panels to extend functionality and year-round usability.
- Proper installation requires locating wall studs for attached designs, digging footings below the frost line for freestanding structures, and confirming local building codes before starting construction.
- Well-integrated garage pergolas increase property value by improving outdoor space flow and helping homes appeal to buyers seeking turnkey outdoor living setups.
Why Add a Pergola to Your Garage?
Garages often sit at the front or side of a property, making them highly visible but underutilized in terms of curb appeal. A pergola attached to or positioned near the garage softens the structure’s utilitarian look and creates defined outdoor zones.
From a practical standpoint, garage pergolas offer partial weather protection for side doors, trash bins, outdoor storage, or a potting bench. They’re especially useful if the garage functions as a workshop or hobby space, step outside for messy tasks like sanding or spray painting under cover without dragging everything into the yard.
Unlike enclosed additions, pergolas typically don’t trigger permitting requirements in most jurisdictions, though it’s worth confirming with your local building department if you’re anchoring posts in concrete footings or attaching ledger boards to the garage structure. Load-bearing walls and roof tie-ins are a different story and often require a permit and inspection.
Pergolas also increase property value by improving the overall flow of outdoor spaces. Real estate agents consistently note that well-integrated hardscaping, including pergolas, helps homes photograph better and appeal to buyers looking for turn-key outdoor living setups.
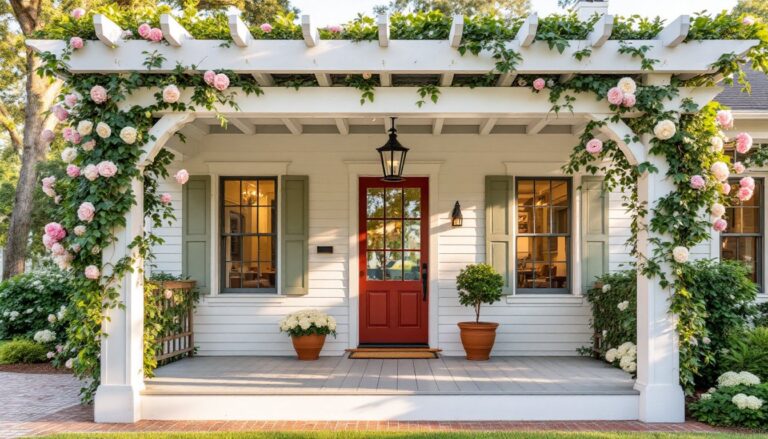
Attached Garage Pergola Designs
Attached pergolas mount directly to the garage wall using a ledger board, a horizontal beam bolted into wall studs or the garage’s rim joist. This style works well when the goal is to extend the roofline visually or create a covered walkway from the driveway to a side door.
Before installation, confirm your garage wall can support the load. Standard 2×8 or 2×10 treated lumber ledger boards work for most residential pergolas, but you’ll need to locate studs with a finder or use lag screws rated for the expected load. Flashing above the ledger board is non-negotiable to prevent water infiltration behind the siding.
Modern Minimalist Garage Pergolas
Minimalist garage pergolas use clean lines, limited ornamentation, and materials like powder-coated aluminum or steel posts paired with horizontal slat roofs. Spacing roof slats 6 to 12 inches apart creates a shadow pattern without blocking too much light, useful if the pergola covers a garage window.
This style pairs well with contemporary or mid-century modern homes. Keep the color palette neutral: black, charcoal, or white frames complement most siding and trim. If the garage has a flat or low-slope roof, a minimalist pergola can extend that roofline without visual conflict.
For a sleeker look, some builders recess the ledger board and use hidden fasteners or through-bolts countersunk and capped. It’s more labor-intensive but eliminates visible hardware. Homeowners interested in outdoor design trends often gravitate toward these streamlined builds.
Rustic and Traditional Styles
Rustic pergolas lean into heavier timber, visible joinery, and decorative rafter tails. 6×6 posts and 2×6 or 2×8 rafters give the structure a robust, craftsman feel that works with traditional, farmhouse, or cottage-style garages.
Consider rough-sawn cedar or Douglas fir for a natural, weathered look, both species resist rot and insects better than standard pine. Leave the wood untreated for a silver-gray patina over time, or apply a semi-transparent stain to maintain the wood grain while adding UV protection.
Decorative brackets, corbels, or knee braces at the post-to-beam connection add visual weight and a handcrafted touch. These elements also provide extra lateral support, which is helpful in wind-prone areas. If you’re comfortable with a miter saw and basic joinery, many woodworking tutorials offer free plans for traditional pergola details.
Freestanding Pergola Options for Garage Areas
If attaching to the garage isn’t feasible, due to siding type, structural concerns, or aesthetics, a freestanding pergola positioned near the garage achieves similar results without the need for ledger boards or wall penetrations.
Freestanding designs require four corner posts anchored in the ground. For stability, dig post holes at least 12 inches in diameter and 36 to 48 inches deep, depending on frost line depth in your area. In cold climates, footings must extend below the frost line to prevent heaving. Pour concrete footings and either set posts directly in wet concrete or use adjustable post bases bolted to cured footings, the latter allows for future leveling adjustments.
Pressure-treated 6×6 posts are the most common choice for DIY builds. They’re affordable, widely available at big-box stores, and rated for ground contact (look for a UC4B or .60 retention level stamp). Alternatively, composite or PVC-wrapped posts eliminate the need for staining or sealing, though they cost roughly double.
Freestanding pergolas offer more flexibility in size and orientation. Position them parallel to the garage to create a carport-style covered zone, or angle them to define a pathway leading from the driveway to a backyard gate. Just ensure the footprint doesn’t interfere with garage door swing, vehicle clearance, or utility lines, call 811 before digging.
One advantage of freestanding builds: they’re easier to modify or relocate later without leaving mounting holes in the garage siding.
Material Choices for Garage Pergolas
Material selection impacts maintenance, lifespan, cost, and aesthetics. Here’s a breakdown of the most common options.
Pressure-treated pine or fir is the budget-friendly standard. Expect to pay $2 to $4 per linear foot for dimensional lumber. It’s easy to cut and assemble with basic tools, but it requires annual staining or sealing to prevent warping and UV damage. Untreated wood will crack and gray within a season.
Cedar and redwood are naturally rot-resistant and offer a richer color and grain. Cedar runs $6 to $10 per linear foot: redwood is often double that. Both can be left untreated to weather naturally or sealed to preserve the original tone. They’re lighter than treated lumber, making them easier to handle during assembly.
Composite materials (typically a wood fiber and polymer blend) eliminate most maintenance. Brands like Trex or TimberTech offer pergola kits or dimensional beams that won’t warp, splinter, or require refinishing. The trade-off is cost, expect to pay 50% to 100% more than wood, and limited sizing options compared to milled lumber.
Aluminum and steel pergolas are increasingly popular for modern or coastal builds. Powder-coated finishes resist rust and fading, and metal frames handle wind loads better than wood. Kits are widely available, though custom welding or cutting may require a metal fabricator if you’re building from scratch.
Vinyl pergolas are low-maintenance and available in white or tan, but they lack the structural heft of wood or metal. They work best in mild climates and smaller spans, anything over 12 feet tends to look flimsy.
For projects blending materials and aesthetic choices, home design resources often feature side-by-side comparisons and real-world durability tests.
Enhancing Your Garage Pergola with Features and Accessories
Once the structure is up, add-ons extend functionality and comfort. Start with shade solutions: retractable fabric canopies, outdoor-rated roller shades, or lattice panels increase coverage without turning the space into a cave. Canopies should be removable or retractable in winter to prevent snow load damage.
Lighting makes the space usable after dark. String lights are easy and inexpensive, but hardwired overhead fixtures or low-voltage LED strips provide more consistent illumination. If running electrical, bury conduit at least 18 inches deep (or per local code) and use weatherproof boxes and GFCI outlets. This is a good time to call a licensed electrician if you’re not comfortable with NEC requirements.
Climbing plants like wisteria, clematis, or grapevines add natural shade and soften the structure, but they also add weight and require regular pruning. Install galvanized wire or cable along the rafters to guide growth and keep vines off the roof shingles if the pergola is attached.
For year-round use, consider adding removable side panels made from clear vinyl, lattice, or corrugated polycarbonate. They block wind and light rain while maintaining an open feel. Panels can be DIY-installed using turnbuckles or simple frame-and-bracket systems.
Ceiling fans designed for outdoor use improve airflow in summer. Make sure the fan is rated for damp or wet locations (UL listing) and that the pergola’s cross beams can support the weight, most fans require a mounting box rated for at least 50 pounds.
Finally, think about flooring. A gravel base, paver patio, or poured concrete pad under the pergola prevents mud and provides a solid surface for furniture or tools. Pavers can be DIY-installed over a compacted gravel and sand base: concrete slabs are more permanent and typically require a permit if they’re larger than 120 square feet or attached to the garage foundation.