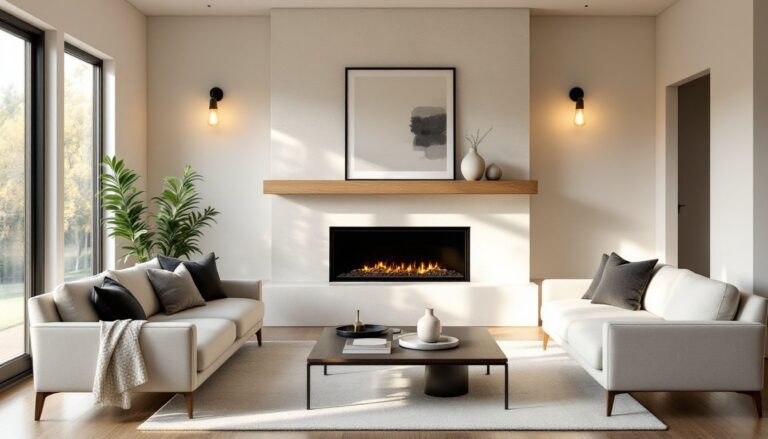
A wood panel TV wall turns a functional necessity into a statement feature. Instead of letting the television dominate the room, wood paneling frames it, adds warmth, and creates visual balance. Whether homeowners are working with a tight apartment wall or a sprawling living room, wood panels offer texture and dimension that drywall alone can’t match. This approach works across design styles, modern, rustic, industrial, or transitional, and can be tailored to nearly any budget or skill level.
Table of Contents
ToggleKey Takeaways
- Wood panel TV wall ideas transform your television into a design feature while concealing wiring and mounting hardware for a cleaner, more intentional look.
- Choose between horizontal slats for a modern, wider feel or vertical slats for added height and drama, depending on your room’s proportions and style.
- Incorporate floating shelves, integrated storage, and LED lighting to enhance both functionality and visual appeal without cluttering the space.
- Proper installation requires furring strips, pre-finishing panels, and careful cable management to achieve a professional result that rivals contractor work.
- Wood paneling improves sound absorption and hides wall imperfections, making it a practical solution for older homes while remaining easy to update with stain or paint.
Why Wood Paneling Is the Perfect TV Wall Solution
Wood paneling solves several design and practical challenges at once. It conceals mounting hardware, wiring, and unsightly cable runs that often clutter a TV setup. The vertical or horizontal lines create rhythm and draw the eye across the wall, making the TV feel intentional rather than tacked on.
From a material standpoint, wood is forgiving and accessible. Standard dimensional lumber, 1x4s, 1x6s, or 1x8s, is available at any home center and works well for slat-style installations. For more textured looks, homeowners can use shiplap, tongue-and-groove paneling, or peel-and-stick wood veneer. Each material offers different labor requirements and visual outcomes.
Wood also provides acoustic benefits. Hard surfaces like drywall reflect sound, which can make dialogue muddy or echoes distracting. Wood paneling, especially when installed with a small air gap behind it, absorbs and diffuses sound. It won’t replace dedicated acoustic treatment, but it improves the listening experience noticeably in most rooms.
Another advantage: wood paneling hides imperfections in the existing wall. Minor cracks, uneven texture, or patched areas disappear once the panels go up. This makes it a smart option for older homes where wall prep would otherwise be time-consuming.
Finally, wood is easy to update. Stain it, paint it, or leave it natural. Sand it down and refinish it if tastes change. Unlike tile or stone feature walls, wood doesn’t require demolition to modify.
Choosing the Right Wood Panel Style for Your Space
The style of wood paneling should reflect both the room’s architecture and the homeowner’s aesthetic preferences. Not all paneling reads the same way.
Horizontal vs. Vertical Wood Slat Panels
Horizontal slats make a room feel wider and more grounded. They work especially well in low-ceilinged spaces or narrow rooms where vertical lines might emphasize the lack of height. Install 1×4 or 1×6 boards with ½-inch to 1-inch spacing for a clean, contemporary look. Spacing can be achieved with plywood strips, spacer blocks, or even pennies for consistent gaps.
For installation, attach a furring strip framework to the wall first, typically 16 inches on center, to provide solid backing. This also creates the shadow gap that gives slat walls their depth. Use a pneumatic brad nailer or 18-gauge finish nails to secure slats to the furring strips. Pre-drill hardwoods to avoid splitting.
Vertical slats draw the eye upward and add height to a room. They’re ideal for spaces with standard or tall ceilings where the goal is to make the wall feel taller and more dramatic. Vertical installations require horizontal furring strips behind them, spaced 24 to 32 inches apart.
Either orientation works, but horizontal tends to feel more modern and streamlined, while vertical leans slightly more traditional or rustic depending on the wood species and finish. Mixing orientations, such as vertical slats flanking a horizontal center section, can create visual interest, though it requires careful layout planning.
Rustic Reclaimed Wood for a Natural Look
Reclaimed wood brings character that new lumber can’t replicate. Weathered barn wood, salvaged pallet boards, or old fence pickets carry natural patina, nail holes, and color variation. This style works best in farmhouse, industrial, or eclectic interiors.
Sourcing reclaimed wood requires attention to safety. Inspect boards for protruding nails, splinters, and rot. Sand or plane surfaces if they’ll be touched frequently, but avoid over-finishing, part of the appeal is the raw texture. Some suppliers kiln-dry reclaimed wood to kill insects and reduce moisture content: if sourcing locally, let boards acclimate indoors for at least 72 hours before installation to prevent warping.
Installation mirrors standard slat techniques, but expect more irregular dimensions. Reclaimed boards often vary in thickness and width, so shimming may be necessary to create a flat plane. Use a level frequently and adjust furring strips as needed. Consider leaving slight imperfections visible, they add authenticity.
For a less labor-intensive option, some manufacturers produce faux reclaimed wood planks with printed or embossed textures. These are lighter, more uniform, and easier to install, though they lack the genuine tactile quality of real salvaged material. Many DIY furniture plans incorporate reclaimed wood techniques for those wanting to practice before committing to a full wall.
Design Ideas to Elevate Your Wood Panel TV Wall
A wood panel TV wall doesn’t have to stop at paneling. Thoughtful additions make it more functional and visually cohesive.
Floating Shelves and Integrated Storage Solutions
Floating shelves flanking the TV add display space for décor, books, or speakers without cluttering the wall. Use ¾-inch plywood or solid hardwood cut to the desired depth, 8 to 12 inches is standard. Mount them to wall studs with heavy-duty floating shelf brackets rated for at least 50 pounds per shelf. Conceal brackets inside the shelf for a clean look.
For a seamless appearance, match the shelf finish to the paneling or use a contrasting tone to create visual layers. Dark walnut shelves against light oak paneling, for example, add definition without competing.
Integrated storage cabinets below the TV hide media components, gaming consoles, and cable boxes. Build a simple cabinet frame from ¾-inch plywood, add doors with concealed hinges, and finish with the same wood species or stain as the wall paneling. Include ventilation holes or mesh panels in the back to prevent electronics from overheating.
Lighting transforms the wall from flat to dramatic. Install LED strip lights behind the TV or along the top or bottom edge of the paneling to create a soft glow. Use warm white (2700K–3000K) LEDs to complement wood tones. For a more refined look, recess LED strips into routed channels along the back of floating shelves or within the panel framework.
Another approach gaining popularity in 2026 is the media niche, a recessed section framed by wood paneling where the TV sits flush with the wall. This requires framing a shallow alcove (typically 4 to 6 inches deep) before installing paneling around it. It’s more complex but delivers a built-in, high-end result. Drawing inspiration from home design shows can help visualize how niches integrate with surrounding paneling.
Cable management is critical. Run cables through in-wall conduit or raceways to keep them hidden. If cutting into drywall isn’t an option, paintable surface-mount cord covers work but should be installed before paneling goes up so they’re concealed behind the wood. Plan wire pathways during the design phase, retrofitting is always harder.
Installation Tips for a Professional Finish
Preparation and precision separate a DIY install from a contractor-quality result.
Start by locating studs with a stud finder and marking their centers with painter’s tape. Most walls have studs 16 inches on center, but older homes may vary. Knowing stud locations ensures secure attachment points for furring strips and heavy components like the TV mount.
Furring strips, typically 1×2 or 1×3 pine, create the framework. Attach them perpendicular to the final panel direction. For horizontal slats, run furring strips vertically: for vertical slats, run them horizontally. Use 2½-inch construction screws driven into studs for maximum hold. Check each strip with a 4-foot level as you go. Shim low spots with wood shims or thin plywood strips to create a flat plane.
Acclimate wood indoors for 48 to 72 hours before cutting or installing. Wood expands and contracts with humidity changes, and installing boards straight from a cold garage can lead to gaps or buckling once they adjust to interior conditions.
Cut panels with a miter saw for clean, square ends. A circular saw with a guide works but requires more care to avoid tearout. For complex angles or irregular walls, a coping saw or jigsaw handles inside cuts. Always wear safety glasses and hearing protection, miter saws are loud and throw debris.
Pre-finish panels before installation whenever possible. It’s faster to stain or paint boards on sawhorses than on the wall. Apply at least two coats of polyurethane, danish oil, or water-based sealer for durability. Let finishes cure fully before handling, rushing this step leads to fingerprints and uneven sheen.
Attach panels with brad nails or finish nails, not screws, to avoid visible fasteners. If using screws for heavy boards, countersink them and fill holes with wood filler that matches the stain. Nail into furring strips, not just drywall. Space fasteners every 12 to 16 inches along each strip.
For consistent spacing between slats, cut a spacer block from scrap wood to the desired gap width. Place it between boards as you install each one, this eliminates guesswork and keeps lines parallel. For those seeking detailed project plans, many woodworking resources offer downloadable templates with exact measurements.
Touch up nail holes and seams with a matching wood filler or putty stick after installation. Lightly sand any rough edges with 220-grit sandpaper, then apply a final coat of finish if needed.
Mount the TV after paneling is complete. Use a stud-mounted full-motion or low-profile bracket rated for the TV’s weight. If the TV mount lands between studs, use a backing board, a horizontal 2×6 or 2×8, secured to multiple studs behind the paneling during the furring strip phase. This provides a solid anchor point anywhere along the wall.