Mounting a TV and soundbar on the wall isn’t just about saving floor space, it’s about creating a cleaner, more intentional viewing experience. When done right, wall-mounted setups reduce clutter, improve audio performance, and give any room a polished, modern look. But getting there means making smart decisions about placement, cable routing, and mounting hardware. This guide walks through practical mounting strategies, placement options, and cable management techniques that turn a basic install into a professional-grade setup. Whether working with drywall, studs, or awkward room layouts, these ideas help homeowners tackle the project with confidence.
Table of Contents
ToggleKey Takeaways
- Wall-mounted TV and soundbar setups save floor space, improve audio clarity by positioning speakers at ear level, and create a polished, modern aesthetic while reducing visible cable clutter.
- Mounting the soundbar below the TV is the most effective configuration for aligning dialogue with on-screen action, with the TV center positioned 42–48 inches from the floor and the soundbar placed 2–6 inches below the screen edge.
- In-wall cable routing using UL-listed low-voltage brackets and recessed power kits provides the most professional appearance while meeting NEC code requirements and eliminating fire risks from standard extension cords.
- Creative mounting options like floating media walls, built-in alcoves, and articulating corner mounts allow you to integrate wall-mounted TV and soundbar installations into any room’s design style, from industrial to mid-century.
- Always anchor TV mounts into studs or heavy-duty toggle anchors rated for combined weight—standard drywall anchors won’t support screens over 32 inches—and use a stud finder with live AC detection to locate studs and avoid hidden electrical wiring.
- For renters or homes with concrete walls, surface-mounted cable raceways offer a reversible, budget-friendly alternative to in-wall routing, though wireless HDMI transmitters can eliminate cable routing entirely for challenging installations.
Why Mount Your TV and Soundbar Together
Wall mounting a TV and soundbar as a coordinated pair solves multiple problems at once. First, it frees up media console space or eliminates the need for a stand entirely. That means more room for decor, storage, or simply a less crowded sightline.
Second, mounting improves soundbar performance. Many soundbars sit too low or get blocked by furniture when placed on a console. Wall mounting positions the speaker at ear level or closer to it, reducing muffled dialogue and improving stereo separation.
Third, it simplifies cable management. Running power and HDMI cables behind the wall or through conduit becomes straightforward when both devices mount to the same vertical plane. No more visible wires snaking down to a TV stand.
Finally, mounting protects gear in homes with kids or pets. A wall-mounted TV can’t tip over, and a soundbar tucked above or below the screen stays out of reach.
Safety and code considerations: Most wall-mounted TVs require anchoring into studs or using heavy-duty toggle anchors rated for the combined weight of the TV and mount. Standard drywall anchors won’t cut it for screens over 32 inches. If running power cables behind drywall, use an in-wall rated power kit to meet NEC code, standard extension cords aren’t rated for enclosed spaces and present a fire risk. Some jurisdictions require permits for electrical work: check local codes before fishing new outlets behind walls.
Best Placement Options for Wall Mounted TVs and Soundbars
Choosing where to position the soundbar relative to the TV affects both aesthetics and audio quality. Two main approaches dominate, each with trade-offs.
Soundbar Above the TV
Mounting the soundbar above the TV works well in rooms where the screen sits lower than ideal viewing height, common in bedrooms or above fireplaces. This setup directs sound downward toward seating, which can improve dialogue clarity if the bar has downward-firing or angled drivers.
Pros:
- Keeps the soundbar away from furniture and obstructions
- Works with ultra-low-profile TV mounts that sit close to the wall
- Useful when mounting above a fireplace mantel where heat rises and below-TV space is limited
Cons:
- Sound may feel disconnected from on-screen action
- Some soundbars lack downward tilt brackets, so sound projects straight out and slightly above ear level
- Visually, it can look top-heavy if the soundbar is bulky
Installation tip: Use a soundbar mounting bracket that matches the brand and model. Universal brackets exist, but manufacturer-specific options often include cable channels and angle adjustments. Measure the distance between TV mounting holes and soundbar bracket holes to ensure both devices center on the same stud.
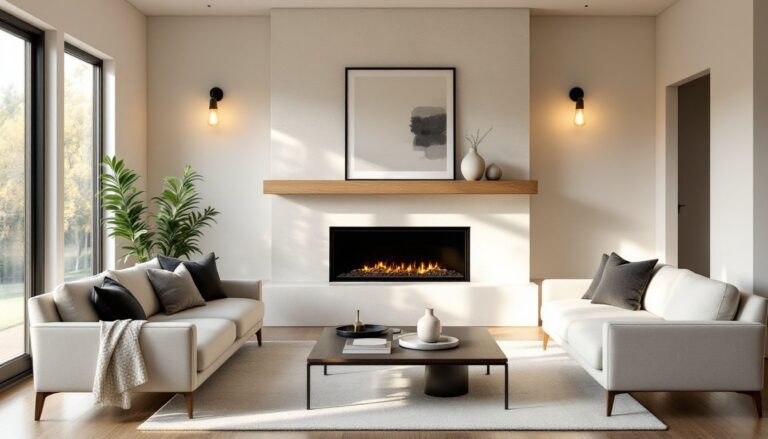
Soundbar Below the TV
This is the most common configuration and usually delivers the best audio alignment. Placing the soundbar directly under the screen keeps dialogue anchored to the picture and matches how most home theater systems are designed.
Pros:
- Sound originates where viewers expect it, right at the screen
- Easier to mount at ear level when seated
- Most soundbar mounts are designed for below-TV placement
Cons:
- Requires enough wall space below the TV: tight spaces or low furniture can block sound
- If the TV uses a tilting or articulating mount, the soundbar may interfere with range of motion
Mounting height: Position the center of the TV screen at 42 to 48 inches from the floor for seated viewing. The soundbar should sit 2 to 6 inches below the bottom edge of the TV, depending on soundbar height and bracket design. Use a laser level or a long spirit level to ensure both devices align horizontally.
Tool note: A stud finder with live AC detection helps locate studs and avoid hidden electrical wiring. Magnetic stud finders work in a pinch but won’t detect wire.
Creative Mounting Ideas for Different Room Styles
Mounting a TV and soundbar doesn’t have to look utilitarian. Integrating the install into the room’s design makes the setup feel intentional rather than tacked on.
Built-in wall units and alcoves: For a seamless look, frame the TV with custom cabinetry or install it in a recessed alcove. This approach hides cables entirely and creates built-in storage for components. Many built-in wall unit designs incorporate floating shelves, LED backlighting, or textured accent walls behind the screen.
Floating media walls: Install a vertical panel, wood slats, shiplap, or a contrasting paint color, that extends from floor to ceiling behind the TV. Mount the TV and soundbar to this panel rather than directly to drywall. This creates visual separation, hides mounting hardware, and makes it easier to run cables behind the panel. Use 1×4 or 1×6 furring strips anchored to studs as a backing framework.
Corner mounts: In rooms with awkward layouts, a full-motion articulating mount lets the TV pull out and swivel. Pair it with a soundbar on a separate articulating bracket so both devices move together. This works in bedrooms, kitchens, or basements where seating isn’t always centered.
Industrial pipe mounts: For loft or industrial-style spaces, build a custom mount using black iron pipe and floor flanges. This DIY approach supports heavy TVs and gives the setup a sculptural, open-frame look. Ensure pipes thread tightly and anchor flanges into studs or blocking.
Mantel mounts with drop-down mechanisms: Mounting above a fireplace is common but not ideal for neck strain. A pull-down TV mount lets the screen drop to eye level when in use and tuck back up when not. Mount the soundbar on a separate fixed bracket below the mantel or attach it to the drop-down mechanism if the mount supports it.
Material and finish coordination: Match TV and soundbar brackets to room finishes, black for modern or industrial spaces, white for minimalist or Scandinavian styles, wood tone for mid-century or rustic looks. Some soundbar mounts come in brushed nickel or matte finishes that blend with hardware elsewhere in the room.
Cable Management Solutions for a Clean Look
Visible cables undermine an otherwise clean install. Several strategies hide or organize wiring, from fully concealed to surface-mounted options.
In-wall cable routing (most professional look): Cut a pair of low-voltage mounting brackets (also called recessed cable plates) into the drywall, one behind the TV, one near the floor behind the media console or outlet. Fish HDMI, optical, and other signal cables through the wall cavity between the two plates. For power, use a UL-listed in-wall power kit with a recessed outlet behind the TV and a plug at the lower plate. This meets NEC code and keeps cables hidden.
Tools needed: Drywall saw or oscillating multi-tool, fish tape or glow rods, voltage detector, stud finder. If working in a home with insulation or fire blocking, expect to drill through horizontal blocking between studs.
Surface-mounted cable raceways: If in-wall routing isn’t possible (concrete walls, renters, or complex framing), adhesive cable raceways or cord covers run along the wall surface. Choose paintable versions and match them to the wall color for a semi-concealed look. Route cables inside the raceway and secure with clips.
Pros: No drywall cutting, reversible, affordable.
Cons: Still visible up close, and cheap raceways look exactly like what they are.
Cable sleeves and wraps: For short runs, such as between the soundbar and TV, use fabric cable sleeves or spiral cable wrap. These bundle multiple cables into one tube, reducing visual clutter. Black or gray versions blend with most walls.
Wireless HDMI transmitters: For situations where running cables is impossible (stone walls, long distances, or mounted above a fireplace with no access), wireless HDMI kits transmit video and audio signals between devices. Latency can be an issue with gaming, but most modern kits handle 4K at 60Hz for streaming and movies. Popular options include systems from brands covering a range from budget to high-end.
Furniture and decor as concealment: Use floating shelves, picture ledges, or a gallery wall around the TV to camouflage cable drops. Running cables behind a vertical stack of frames or along the edge of a shelf makes them less obvious.
Soundbar-specific cable tricks: Many soundbars connect via a single HDMI ARC/eARC cable or optical cable. If the TV has HDMI ARC on a rear or side port, the soundbar cable can loop behind the TV mount and drop straight down with the power cable. Some soundbar mounts include integrated cable clips or channels that route wires inside the bracket.
Safety reminder: Never run standard power cords or extension cords inside walls. Always use in-wall rated cable (CL2 or CL3 for low-voltage, and in-wall power kits for outlets). Wear safety goggles when cutting drywall and gloves when handling metal fish tape or drywall edges.
Conclusion
Mounting a TV and soundbar together turns a basic entertainment setup into a streamlined, purposeful feature of the room. With the right placement, mounting hardware, and cable management, the install looks professional and performs better than a furniture-based arrangement. Take time to locate studs, choose appropriate anchors, and plan cable routes before drilling. The result is a cleaner wall, better sound, and a setup that stays put.